Autumn and winter, if the weather is favourable is a good time to get on with those big garden construction projects we've all been planning. One of those can be building a pond or water feature in the garden. I've built several ponds and water features in my career. This blog isn't so much a how to about building ponds as there are so many different blogs, websites and you tube videos explaining how to do it way better than I could. I thought instead I would chat about the different water features I've built.
 |
2007
|
1988 - While I was at college, my parents moved house, building a house and having a blank canvas for a garden. One of the features they wanted was a pond and because the garden was on a slope this made it easier to create the three tier pond and waterfall feature that we built. The biggest pond was at the bottom, graduating upwards over two waterfalls to the smallest pond at the top. The waterfall between the bottom two ponds also had a stone pathway built over it. These ponds were lined with butyle pond lines and we used stone that had been dug during the house build. The ponds were planted up around the edges and then surrounded by lawns. Over time they were changed in some ways, for example the bottom pond had a beach built into it when grand children came along, to make it shallower and more child friendly. Around 2007, due to a need for easier maintenance and leaking ponds the top two ponds were filled in and integrated into the surrounding borders.
 |
| Myself sowing grass seed in the back ground and my Dad making faces at the camera. |
2004 - I bought this half barrel and metal pump which was then bolted onto the barrel (the one you can now see in the nursery). I took out the pump action so I could put a pipe in, but allowing for the handle to still be moved. I fed a piece of garden hose up through the pump so it sat just inside the outlet with the other end in the water in the barrel. Attached to this was a small pond pump which circulated the pump continually through the metal pump. Powered by electricity it had a power cable buried in the gravel to the base of the barrel. I sat a few pond plants on bricks so they were at the right level and it did very well for 13 years until I had to move house. We even had fish in it at one time.
 |
A self contained half barrel water feature
|
2003 - This beautiful fountain came back from France in the boot of the car! I know, I'm mad, if I travelled on holiday by car it was full of luggage, kids, sometimes our dog and on the way home, plants, mementoes and twice a fountain! They were so much cheaper in Europe it was a shame not too. This fountain luckily came in three pieces and from a garden statue shop in Normandy. It was to be sited in a formal part of the gardens in our last garden, in what became known as the morning garden. A garden full of yellow and white flowers and foliage, brick paths and a box hedge around the outside.
 |
| My french fountain with the three graces around its base |
To construct this water feature a sump was dug in the ground below where it would sit, approx three feet across and three to four feet deep. This was then lined with a butyle liner which was cemented around the top under the last ring of bricks. In the middle a brick plinth was built to the correct height for the base of the fountain to sit on. A steel mesh grid was then cut to fit around and placed on top of the lip just below the bricks around the edge of the water feature. The fountain was then cemented in place and lots of lovely round cobles placed on the wire mesh. This hid all the gubins below and let the water flow back into the cistern below. As the fountain pieces were cemented in place a pipe was fed up through from the sump where it was attached to a pump. Finally ended in a piece of copper pipe that fitted into the base of the fountain bowl at the top. This water feature needs an electricity supply which came from the outdoor supply and was buried under the side of the brick path before the paths were completed.
 |
| In place, in the morning garden, I miss this garden and view so much |
 |
| In early spring once tidied up |
 |
| Surrounded by white and yellow plants |
This completly self contained water feature is a large ceramic bowl, abour 60cm wide and 30cm deep. In it I have a miniature water lily and I have had water hyacinths in it some summers too.


2008 - Another European acquisition, this time on a holiday to Belgium. Again a roadside purveyor that we passed of all things garden statue and fountain and so much cheaper than the UK. Again this one came in three pieces so was easier and smaller to fit in the car. Once home we built a raised brick border planted with Nepeta 'Six Hills Giant' and Vinca. This was surrounded by an arbour of trellis with a honey suckle and scented rose over it. A cafe chair and a few pots of scented herbs made it a lovely place to sit and listen to the quiet sound of the fountain. This one is completely self contained, what it did need was a power supply and a pump. Using the smallest pump possible as it has to sit in the small basin at the bottom and wired into the outdoor electricity supply, this fountain produced a gentle trickle of water.
 |
| The Belgian Fountain |
 |
| A quiet arbour at the side of the house |
 |
Nepeta 'Six Hill Giant' in full flower
|
 |
| A close up of the Belgian fountain |
2013 - This is taken from a blog I wrote back in my early blogging days about the wildlife pond we built, again in my last garden. A new part of the garden we had designed in front of the old workshop that became David's office when he moved in. Once the office was finished we wanted to landscape the bit of ground between it and the drive, not least because it is the first thing you saw when you drove up the drive and parked up in front of the house. For 13 years this has been an unsightly patch of weedy waste ground where things got dumped.
 |
| Old workshop and general waste area |
So how do you build a pond? It really depends on what style and design you want. We wanted a natural style of pond that would fit into the native garden and provide homes for small creatures and be big enough to make a visual impact. Firstly you have to decide where it is going to go and start digging a hole! The most important thing is to make sure the sides are level all the way round, otherwise you'll have water escaping and liner showing which spoils the whole effect. This series of pictures shows the process we went through with this pond.
 |
| Fine tuning the levels and depth of the pond, this pond has 3 different depths |
 |
| I added a thick layer of sand to protect the liner, especially as this is stoney soil |
 |
Next lay in some underlay. This can be old carpet, carpet underlay
or a ready made pond liner. We recycled some old office carpeting |
 |
Yes it was freezing! Its Scotland in October, even if the weather has been unseasonably warm!
Someone has to get the short straw to make sure all the creases are smoothed out as the pond fills |
 |
| The building has its cladding on and new doors and the garden is coming together |
Here we have started trimming the liner to size and burying the edges under soil and put in place bags of gravel and cobbles for beach at this end where it merges into the gravel of the drive. We used three different sizes of gravel and cobbles to give a more natural look.
 |
| An ariel view from upstairs |
 |
| Waiting for planting - spot Bracken |
In 2014 I had to sell my home and beautiful garden and leave it all behind and then another chapter in my life unfolded, quite unplanned and unseen, this was Quercus Garden Plants. It gave me a new lease of life after what had been a few difficult years and of course I set to work on another garden. Its an interesting fact, that I have never inherited a garden. Ever single garden I have owned has been created from a derelict piece of ground. Quercus is my third garden and the third I've carved out from wilderness.

2015 - The water features at Quercus. We are so lucky to have a natural stream running along the bounder of the nursery. When we arrived on site in 2015 I knew immediately this would become a major part of the nursery gardens and would give us an interesting and beautiful entrance. One of the first things I bought for the nursery was a bridge. I know, I know. I'd always wanted a Monet bridge a la Giverney and now I could have my very own miniature version. There is very little soil on either side here, it being on the edge of the car park but over the years I've built it up with a layer of our home made compost. Plants here include some that like damp conditions, marginals, shade plants and groundcover.
 |
| There was a lot of weed clearing to do to clear the borders for the stream garden |
 |
| Beginning to plant up the sides of the stream garden |
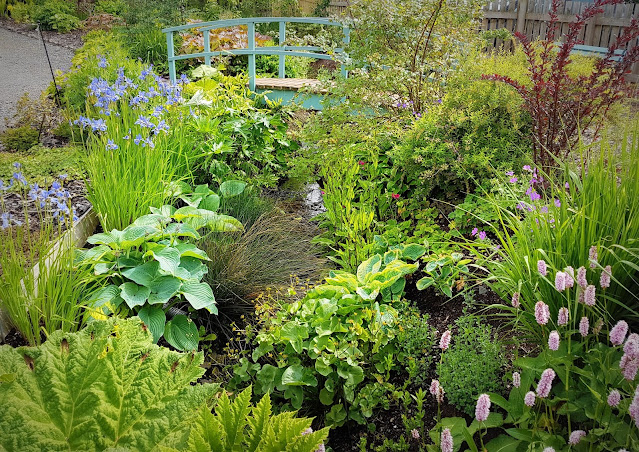 |
| FIve years later in 2020 the borders are a lush and colourful tapestry of plants |
In 2019 one of my new garden projects was to extend the stream garden on the other side of the bridge. This again involved a lot of weed clearing and planting into very shallow ground. I've used a lot of what I call enthusiastic growers here as they can pretty much do what they want and not cause a problem to more delicate plants. The stream disappears into a curtain of Rodgersia and Eupatorium at the end.
 |
| Creating the stream extension in 2019 |
 |
| Summer 2020 |
In 2017 we created the herb garden, this is the most formal garden in the nursery and was built for two reasons, I love herbs and wanted a herb garden and we wanted somewhere special to get married in August 2017, no pressure to get it ready then! We had found a rectangular pre-formed pond amongst all the stuff lying around when we bought the nursery so decided to use this in the herb garden, A lot of very difficult digging to get a hole three feet deep in hard clay soil was under taken by David and his son Adam. Very well done to them for getting it done, it was not an easy task! Once the hole was shaped and the right size the pond line fitted snuggly in. It was finished off with a surround of the bricks used around all the borders in this garden. A fountain was placed in the centre, powered by mains electric. This provides a pleasant musical back ground when sitting in the herb garden. We also have three fish in the pond, Jummy, Hengest and Vortigern.
 |
| Working out the layout of the herb garden |
 |
| The Herb garden pond |
2019 - Our watering can cascade - this feature is not quite finished, it needs a bit of time to get the water flowing correctly from can to can without spilling out. Even without the water flowing it provides a great feature on the fence in the sales area.

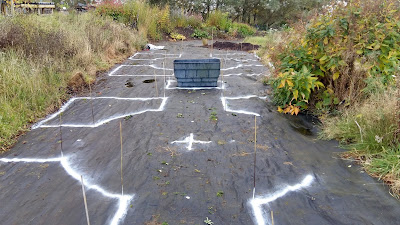
2019 - a busy year, in fact we finished three new garden projects that year, the stream extension, the wildlife garden and Cornucopia garden. A wildlife garden really should have a pond in it to attract all those aquatic bugs and beasties. We placed our pond in the widest part of the wildlife garden. In the end it cost us very little as we had inherited a pond liner when we bought the nursery the stone around the edges was given to us by a customer and all the plants we had in stock. We had pond skaters, diving beetles and so many other beasties, frogs and toads within two weeks of it being finished. Now a year later we have newts, damsel flies both of which were mating this year and so much more.
 |
| I was getting worried as to what this hole was for..... |
 |
| Just needs the corners rounded off |
 |
| The pond lined with sand and getting the liner unrolled |
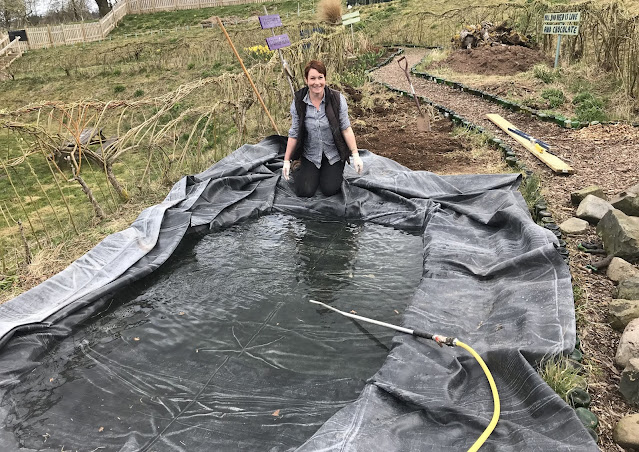 |
| Filling up the pond and shaping and tucking the liner as the water fills up |
 |
| Placing the edging stones |
 |
| Piercing the lines to create the bog area |
 |
| Creating hiding places and habitats by placing piles of stones in the pond |
 |
Adding the compost to the surrounding
border and planting up |
 |
| Placing plants |
 |
| A year old, summer 2020 |
 |
| Damsel flies |
 |
| Newts |
 |
| tadpoles |
So you can see I've actually created quite a lot of ponds and water features on my garden, I was quite surprised when I started putting this blog together. I'm sure there will be a few more in the future too.
#rural #countrylife #countryliving #cottagelife #antiquecottagescenes #interiors #scottishborders #independantretailer #smallbusiness #localbusiness #independantplantnursery #uniqueplantnursery #hardyscottishplants #scottishgarden #gardeningontheedge #scottishborders #hillwalking #Peebleshills
Find out what's been happening in our garden at home like our Facebook page
If you to see whats new and looking good at the nursery like our Facebook page
Follow us on Instagram @quirkybirdgardener
All contents and photographs © Rona, unauthorised reproduction & use of these images is strictly forbidden, thank you


Comments
Post a Comment